The Inspiring of WoodCraft

Sand Paper

sandpaper
No chapter about smoothing tools would be complete without discussing sandpaper. Like many woodworkers, I loathe sanding. It's messy work that I try to keep to a minimum. Whenever possible, I reduce hand- or power-sanding with the appropriate use of planes and scrapers. But unless a project consists mainly of flat, square surfaces (like many Craftsman-style designs), I end up using sandpaper for final smoothing.
Types of sandpaper
Types of sandpaper1
There are three main types of sandpaper that are commonly used in a woodshop: silicon-carbide, garnet, and aluminum-oxide (top to bottom in the top photo). For years, all that was available was garnet sandpaper, made from finely crushed semiprecious stones.
Types of sandpaper1
This type of paper tends to dull and wear out quickly but has the best reputation for smoothing without leaving scratches. Silicon-carbide paper (often called wet/dry sandpaper) is used primarily for sanding between coats of finish, since it can be used wet. Aluminum-oxide is a relatively new abrasive that stands up well and lasts much longer than garnet.
Regardless of the type of abrasive, all sandpaper is categorized by grits that define the size of the particle (see the chart below).
sand paper grits
Although there are many rules of thumb for grit selection, I've found that I usually need only two for smoothing. I start with 150-grit and then finish with 220. This is possible because I don't expect the sandpaper to do what I should have done with a plane or a scraper. Instead of grinding away at an imperfection with a power sander, I'll remove it first with a plane or scraper. Many woodworkers don't realize that it's actually faster this way.
Hand-sanding
If you're planning on sanding by hand, I suggest ripping a standard 9"xll" sheet in half across its width and then folding it in thirds, as shown in the middle drawing on the opposite page. This creates three separate sanding surfaces that can be folded over in turn to produce a fresh surface as the other two sides wear out. Just as important, folding the paper like this prevents the grit side of sandpaper from rubbing against itself which will dull it before you even have a chance to use it.
Sanding block
Types of sandpaper1
I also strongly recommend a sanding block, especially if you're working on a flat surface. A sanding block helps to distribute sanding pressure evenly and reduces hand fatigue. Although you can purchase many snazzy sanding blocks with complicated levers and fancy hold-downs, I've always felt a scrap of wood or a cork block wrapped with sandpaper works best. You can quickly change paper and even modify the block to make it better suit the job at hand. As with any sanding, make sure to sand with the grain to prevent cross-grain scratches. Also, clean the sandpaper often by removing it from the sanding block and giving it a sharp rap on the edge of your workbench.
SANDING PLATE
sanding plate
Years ago, the folks at Sandvik came up with a terrific product called a sanding plate that I've grown quite fond of (photo at right). It's basically a serrated metal plate that works sort of like a cheese grater for wood. Precision holes are punched in the hardened steel to create tiny, volcano-like craters with sharp edges (drawing at right).
sanding plate
Since these holes are made with much accuracy the resulting steel plate performs like varying grades of sandpaper, but it doesn't wear out and it rarely, if ever, clogs. The sanding plate is cut into different shapes and sizes and is attached to plastic handles—some in the form of a sanding block, others like files. When the plate finally does wear out, you can strip it off and slap on a replacement plate.

Beading Tools

beading tools
A beading tool is sort of a hybrid between a scraper and a plane (foreground in photo). They're often confused with beading planes (background in photo), like my Stanley No. 50, that have molded cutters sharpened like plane blades. To make things even more confusing, this particular beading tool looks a lot like a spokeshave (see Corner Shisels). A beading tool is designed to hold a variety of cutters to create beads, reeds, flutes, grooves, and other decorative edges. Since they're slow-cutting and work well only with the grain, these have been superseded by the portable router. So it might surprise you to learn that they are still being made. The beading tool shown here is made by Lie-Nielsen Toolworks (www.lie-nielsen.com) and is a reproduction of the old Stanley No. 66.
So if the beading tool has been replaced by the router, why is it still being made? Nostalgia? The answer is that this classic tool still outperforms its modern counterpart in two important ways.
beading tools
First, the small "sole" of the tool allows you to easily follow a three-dimensional curve (such as a cabriole leg), where the larger base of a router can't travel. Second, you can make your own cutters to match antique molding or create your own, for that matter.
A beading tool is similar to a cabinet scraper in that the cutter rests against the body at a preset angle and is held in place with one or more retaining screws (right drawing). Quality beading tools come with one or more fences that help guide the cutter along the edge of the work-piece.
Selecting the cutter
beading tools, Selecting the cutter
To use a beading tool, start by selecting the desired cutter. Loosen the knurled knob and slide the cutter in place (right photo). If you can't find the profile you're looking for, Lie-Nielsen supplies blanks with the tool so you can grind any profile you want (technically the negative of the profile you want). Just make sure to flatten the back of the cutter just as you would a plane blade, and then sharpen the profile with slipstones or diamond hones.
Adjusting the cutter
beading tools, Adjusting the cutter
Once you've got the cutter installed, you can adjust it (right photo). If the cutter is small, you can adjust it for a full cut from the start. For larger cutters, I recommend setting it so just the first 1/16" or so protrudes, and then make a few passes. Then lower the cutter an additional 1/16" and repeat until the full profile is reached. You'll also want to adjust the fence or fences to position the cutter on the work-piece at the correct starting point.
Basic use
beading tools, basic use
The big thing to keep in mind when using a beading tool is patience. Even when sharpened correctly, these tools are very slow-cutting. Relax and take your time. Enjoy watching the profile slowly take shape. For your first couple of passes, take it easy on the downward pressure (right photo). Let the tool begin the cut. Once it's clearly started, apply gentle pressure and keep the tool moving.
SHOP-MADE SCRATCH STOCK
Home-made beading tools or "scratch stocks" could be found in every cabinetmaker's toolbox in the past.Although they took a lot longer to use, they were a lot less expensive than a molding plane, and a new cutter could be made in a short while.
shop-made scratch stock
A scratch stock is basically just a handle with a kerf cut in it to accept a cutter. Screws pass through the kerfed portion of the stock to pinch the cutter in place (right drawing). These are very easy to make and can be a lot of fun to use. NOTE: To hold the cutter as securely as possible, I suggest using machine screws that pass through the body; then thread on nuts.
Making your own cutter
shop-made scratch stock
You can make your own cutter from an old scraper blade or broken saw blade. Just draw out the negative of the profile you're after and grind or file away the waste (right photo). Make sure to flatten the back of the cutter and hone the edge sharp with slipstones.
Basic use
shop-made scratch stock
Since the cutter for a scratch stock is a scraper, you'll have to tilt it to find the correct cutting angle (right photo). Pivot the stock until cutting action begins. Just as with a beading took use little downward pressure at first and take light cuts. As the profile begins to take shape, apply gentle pressure and take your time.

Handled Scraper

Handled scrapers
A variation of the cabinet scraper is the handled scraper (top photo). These are designed to be used with either one hand or two. The handled scrapers at left in the photo are called shave hooks, and are basically scraper blades attached to metal rods inserted into wood handles. The scraper blades come in a variety of shapes and sizes and are intended mostly to remove paint and old finishes from moldings and other curved surfaces. But I've found that if you sharpen them properly and roll a nice burr on the end, they can work much better than a gooseneck scraper.
Handled scrapers
The middle and far right scraper in the top photo are basically paint scrapers, good primarily for removing glue squeezeout. The Sandvik scraper (middle photo) features a triangular carbide blade that stands up very well and can be rotated to a fresh edge when one side dulls.
Handled scrapers
One of my favorite handled scrapers is my grandfathers Stanley No. 82, shown in the middle photo. It's quite an interesting tool that works surprisingly well. Although the actual scraper blade is pretty small, it fits in a sturdy head that can be adjusted to the desired angle. In use, you grip the long handle with one hand and then press down on the front knob with the other (bottom photo). This produces a considerable amount of pressure on the blade, and you can remove a lot of wood quickly. At the same time, a light touch can produce thin, wispy shavings. Even though these scrapers aren't being made anymore, you can regularly find them at auctions, at yards sales, and on the Internet for just a couple of dollars.

Cabinet Scraper

Cabinet scraper
As I mentioned on Scraper Planes, the cabinet scraper has often been confused with the scraper plane. The cabinet scraper (often called a doublehandled scraper) is designed to reduce the fatigue often associated with hand scraping (top photo). It's basically a metal body that holds the scraper blade at a preset angle, typically around 110 degrees. The blade is held in place by a pair of retaining screws, either slotted or with knurled ends (middle drawing). The traditional grinding angle of a cabinet scrapers blade is 45 degrees. This creates a sturdy burr that can take a more aggressive cut.
Cabinet scraper
Just like a hand scraper, the blade of a cabinet scraper should be flexed to create the desired depth of cut—and here's where the real beauty of this tool shows. Instead of wearing out your thumbs from flexing the blade is flexed by way of a thumbscrew that's threaded through the body (bottom drawing). To adjust the flex, tighten the retaining screws with the adjustment screw slack. Then tighten the thumbscrew for the desired cut and make a test shaving. Like the scraper plane, a cabinet scraper works well on thin or delicate stock that could easily tear if a hand scraper were to catch or dig into the surface.
Cabinet scraper

Hand Scrapers

Hand scrapers
The first time I saw a scraper in action, I was sure some form of magic was involved. A cabinetmaker friend of mine was using one to smooth a panel made up of several pieces of tiger-stripe maple. Now this stuff has a deservedly nasty reputation for tearing out while planing. But my friend was pulling off delightfully thin shavings with a hand scraper. It just didn't seem possible to do this with a plain piece of metal about the size of a standard index card.
Hand scrapers
The scraper wasn't actually plain—its edges had been carefully sharpened and then burnished to form a tiny hook or burr on the end. This burr is what makes a scraper work. In effect, it serves as a tiny plane blade. One of the reasons it works so well on hard-to-plane woods is that the burr is so small. The tight radius of the curve acts as a chip breaker to almost instantly break a shaving so that the chance of tear-out is greatly reduced. The hand scraper is traditionally sharpened at 90 degrees, but some woodworkers prefer the more aggressive 45-degree angle that's common on cabinet scrapers and scraper planes.
Besides knowing how to sharpen a scraper (see Sharpening Scrapers), there are a couple of tricks to the "magic" of using a scraper: flexing, finding the angle, and skewing.
GOOSENECK SCRAPERS
GOOSENECK SCRAPERS
Gooseneck or curved scrapers are a special type of hand scraper designed to let you smooth curved surfaces. The curves vary along the perimeter so that you can position the scraper to match the curve of your work-piece. These work reasonably well but can be difficult to both sharpen and burnish. As a general rule, I recommend that you find the curve you want, mark a couple of pencil lines on the scraper, and concentrate on sharpening and burnishing just this area. If you were to create a burr along the entire perimeter, it would dig into your fingers during use.
Flexing
Hand scrapers, Flexing
Technically, you can use a scraper without flexing it at all. The problem is, you're asking the scraper to take off a shaving its full width. For a standard scraper, that's around 4½" to 6" wide! Even with a sharp scraper and a lot of elbow grease this would be difficult. Instead, you can reduce the cutting area by flexing the scraper slightly. Grip the ends of the scraper with both hands, and press lightly in the middle with both thumbs. Note that the greater the flex, the smaller the cutting area and the more of a scooping cut you'll make.
Finding the angle
Hand scrapers, Finding the angle
Here's the tricky part that confuses a lot of woodworkers: finding the correct scraping angle. What makes this such a challenge is that it's different for every scraper, and will most likely change every time you burnish the edge. And that's normal. Burnishing isn't an exact science, and the angle will change. As long as you can feel a burr, all you have to do is tilt the scraper forward or backward until it "bites" into. When it does, just lock your wrists in this position and start scraping.
Skewing
Hand scrapers, Skewing
Just as with a hand plane, skewing a scraper produces more of a shearing cut and will likely produce nicer shavings. Note that if you're producing dust, either your scraper is dull or you're at the wrong angle. It's also important to remember that when you skew something, you effectively reduce its ability to smooth out highs and lows—instead, the tool will follow surface undulations.
One of the great scraper debates is whether 'tis nobler to pull or push. I actually use both motions, and in my mind there is no right or wrong way—just go with what feels natural for you.
Pushing
Hand scrapers, Pushing
When I've got a lot a scraping to do, I prefer to push the scraper. This method gets more of your body behind the stroke and tends to be less fatiguing overall. I've also found it's easier to maintain the desired flex while pushing, especially if it's flexed a lot and I'm making more of a scooping cut. The disadvantage to pushing is that it lacks the control that pulling a scraper offers.
Pulling
Hand scrapers, Pulling
Those who pull a scraper feel it offers better control. I couldn't agree more. Whenever I'm making the finishing passes with a hand scraper, I often switch to the pull stroke. Among other things, this method lets you see what you're doing—unlike a scraper being pushed, which obscures the surface. The only problem is, I don't find the hand position very comfortable. Instead of my arms being tucked in, they extend away from my body. And flexing the blade soon becomes tiring. It's easy to see why I use this for finish passes and not for the bulk of the removal.
On edge
Hand scrapers, On edge
Occasionally, you may find it useful to use a scraper on edge, such as when you're cleaning out a rabbet. Holding it on end allows you to flex the scraper more easily than if it were on its side. However, you'll need to sharpen the end, which will make it uncomfortable to use on its side. I have an old scraper sharpened just for this use.

Scraper Planes

scraper planes
Two of the most often-confused hand tools are the scraper plane and the cabinet scraper (see Cabinet Scraper). Part of this is because Stanley manufactured a No. 12 scraper plane for many years that somewhat resembles the typical cabinet scraper. There are a number of things, though, that set these two tools apart. A scraper plane (top photo) consists of a plane-like body that holds a scraper blade at a precise angle: typically 25 degrees from vertical (middle drawing). This makes it the tool of choice for dealing with squirrelly and other hard-to-plane grain.
scraper planes, typically 25 degrees from vertical
The big advantage this setup has over the cabinet scraper is that the longer sole prevents it from dipping in and out of surface imperfections; instead, it quickly levels off the surface. And unlike a cabinet scraper, where the scraper blade is bowed (via a thumbscrew) to produce more of a scooping cut, the blade of a scraper plane is flat and cuts along its full width (bottom drawing). The blade, however, is sharpened much like that of a cabinet scraper: It's ground to around a 45-degree bevel and then a burr is burnished on the edge (see Sharpening Scrapers for more on this).
the blade of a scraper plane is flat and cuts along its full width

Combination Planes

Combination planes no. 45
Unlike most planes that handle a single task, combination planes (often called multiplanes) were designed to take on many planing jobs. In fact, some manufacturers referred to these planes as "universal" planes. An old Stanley catalog I own (copyright 1909) touts their model No. 55 as a plane that "will do a greater variety of work than can be done with a full line of so called Fancy Planes." Two of the more famous combination planes are the Stanley No. 45 (top photo) and No. 55 (bottom photo). They can be used to cut grooves, dadoes, rabbets, beads, tongues, ovolos, molding, reeds, hollows and rounds, and nosings. Both consist of a cast-iron body with a wood handle. A fence attaches to the body with a pair of guide rails, and built-in depth adjustment allows for accurate repeat cuts.
Combination planes no. 55
Although I'm sure these planes sounded like a great idea to many craftsmen who were tired of lugging around a box of planes, there are a couple of disadvantages to a "universal" plane. First, these beasts require some serious setup time. Every time you want to switch functions, you have to change cutters, add or remove parts, and make some adjustments—not as convenient as reaching into the toolbox for a molding plane. Second, no chip breakers are used and the cutters aren't supported well. Combine these and you have a tendency toward chatter. When the electric router was introduced, combination planes fell by the wayside. Nowadays, they're sought after mostly by tool collectors and individuals who like working wood the old ways. Combination planes are popular with tool restorers because they leave the appropriate tool marks that a router or shaper doesn't.

Scrub Planes

scrub planes
A scrub plane (also known as a roughing plane) is another one of those planes that you don't see around the shop very much anymore (top photo). That's because they're designed to quickly remove a lot of wood—when thicknessing a board, for example—and this job has been taken over by the electric thickness-planer. In many cases, scrub planes were made from old, worn-out jack planes. The throat was widened to prevent jams, as the shavings were thick and rough. The blade was usually a single cutter with no cap iron (bottom drawing).
Curved profile
scrub planes, Curved profile
What makes a scrub plane cut so aggressively is the curved or "scoop" profile ground on its business end (middle drawing). A curved grind like this lets you quickly remove a lot of wood. What it doesn't do is leave a smooth surface. But that's irrelevant here; all that a scrub plane is supposed to do is allow you to level a surface quickly, and it does just that.
Basic use
scrub planes, Basic use
Unlike most traditional planing, a scrub plane can be effectively used against the grain, or more commonly at a 45-degree angle. In addition to leveling surfaces, a scrub plane can also be pressed into service whenever you need to remove a lot of wood fast. The beginning cuts for scooping out a seat, a taper at the end of a work-piece, or even the beginning stages of coopering a door are all tasks that a scrub plane can handle. You can often pick one of these up at an auction or yard sale for a few dollars, or you can make your own by converting an old jack plane.

Japanese Planes

japanese plane
I'll admit that I was quite excited to try out my first Japanese plane (right photo). Since I had quickly grown so fond of Japanese saws, I thought the planes were sure to find a treasured spot in my tool chest. Although these planes can be very sweet when tuned properly they do require a substantial amount of fiddling just to get them to work properly. As with any woodbodied plane, they also require constant attention to make sure they're cutting true. The wood sole can twist or warp and will need to be periodically trued.
Don't get me wrong, I have quite a few wood-bodied planes in my shop; I just don't use them all the time. If I'm in a hurry, I'll stick with a metal-bodied plane that I know will be relatively square and able to get to work right off the shelf. If you don't mind tinkering a bit, you may enjoy a Japanese plane. They do take some getting used to—unlike their Western cousins, Japanese planes cut on the pull stroke.
The simplicity of japanese plane
The body (or dia) of the plane serves as its handles. You wrap your hands, or hand, carefully around the body and pull to create a nice, thin shaving. The simplicity of a Japanese plane (left drawing) is also one of its primary drawbacks. The laminated blade fits into tapered grooves in the dia, and the chip breaker is held in place by a metal pin. The absence of a frog means you'll have to devote time whenever you use it to properly adjust the blade to the desired depth of cut.

Circular Planes

circular planes
A circular plane (or compass plane, as it's often called) is another one of those specialized planes that'll you'll be glad you have when a project calls for planing a fair curve (left photo). The most distinctive feature of a circular plane is that it has a thin, flexible sole (right drawing). Adjusting the curvature nut forces the sole into either a convex or concave shape. The blade and cap iron rest on a frog that works much like that of any other metalbodied plane.
circular planes
Although Record still produces the No. 020C shown here, you can occasionally find a Stanley No. 13 (highly prized by tool collectors) at a tool auction or on the Internet. I realize that many woodworkers would simply grab a belt sander or other electric sanding device to smooth a gradual curve; but a circular plane will leave a cleaner, more fair curve than you can achieve with one of those noisy dusty tools.
Convex planing
circular planes, Convex planing
One of the classic uses for a circular plane is truing up the perimeter of a round work-piece, such as a table top. The beauty of using one of these planes is that when the circle is true, you'll know it: The plane's cutting action will slow significantly. To use a circular plane for this, start by adjusting the sole to closely approximate the curve of the work-piece. Adjust the plane blade for a fine cut and start planing. As with any plane, you'll need to be careful to plane with the grain, and not against it. This takes a bit more thought, since the grain direction will change periodically as you work around the top's circumference.
Concave planing
circular planes, Concave planing
A circular plane also makes quick work of truing up an inside curve (left photo). Though you can start as you did with a convex cut by adjusting the planes sole to match the inside curve, I've found that if you adjust it so that it's a hair tighter than the inside curve, you'll have better luck. A tighter curve on the sole allows the plane to fit tighter to the curve and makes it easier to lop off the high spots.
circular planes, Concave planing
Once the high spots are gone, you can readjust the plane's sole to better match the inside curve. As with a convex cut, it's important to take extra care to prevent planing against the grain (right drawing). This is one plane that will gladly bury its blade in end grain and tear out a big chunk of wood.

Chisel Planes

chisel plane
chisel plane
chisel plane
A chisel plane is easily identified by the absence of a fore sole (top photo). The advantage to this is that it lets you reach all the way into a corner—when cleaning up a rabbet, for example (middle drawing). A chisel plane is also useful for removing glue squeeze-out and for trimming plugs or pegs flush with a surface. The disadvantage to not having a fore sole is that the blade has a tendency to vibrate or chatter (bottom drawing). This makes the chisel plane generally unfit for regular planing tasks.
A chisel plane in the workshop is like a 1-iron in your golf bag: You won't use it most days, but when the conditions are right, it's the perfect tool for the job. Yes, you could do most of the tasks listed above with other tools; but if your budget permits, you'll be glad you picked up one of these fine tools.

Shoulder Planes

shoulder plane
After a good jack plane and a low-angle block plane, the next plane I`d suggest a beginning woodworker purchase is a quality shoulder plane (right photo). Shoulder planes excel at trimming and fine-tuning joints. They're great for trimming rabbets, shoulders, tenons, dadoes, and grooves. This is the tool to reach for when a joint just doesn't fit right and needs a "tweak" or two to get that perfect fit. Most shoulder planes are all-metal to help create a heavy, dense tool that can effectively prevent or dampen blade chatter.
shoulder plane
The blade on a shoulder plane runs the full width of the body, and the sides and sole of the plane are ground at perfect right angles to each other (left drawing).
Shoulder planes come in widths ranging from 1/2" to slightly over an inch. As on a block plane, the blade is mounted bevel-up and generally has an effective cutting angle of around 37 degrees. This makes it quite good at trimming end grain. Another thing that helps with trimming end grain and making fine cuts in general is an adjustable throat. On some planes this is adjustable by way of a screw; other planes require that you add or remove shims between the two halves of the body to vary the opening. The blade can be held in place a number of ways. On some larger planes, the blade is often held fast by a lever cap and a locking screw while others use a more traditional lever cap screw that requires a screwdriver. Smaller shoulder planes generally use a wedge and are adjusted like any wood-bodied plane: You tap on the front or rear of the body to lower or raise the blade.
Trimming tenons
shoulder plane, Trimming tenons
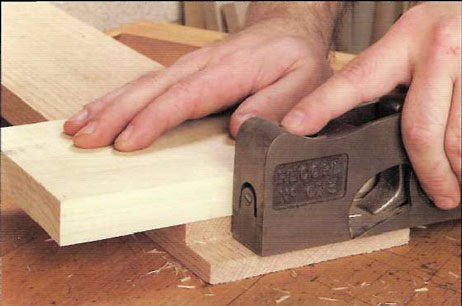
My general rule of thumb for cutting mortise-and-tenon joints is to cut the mortise first and then cut the tenons to fit. If you're chopping the mortises by hand (see Mortise Chisels), you'll likely find some variations from mortise to mortise. This means you'll have to trim or fine-tune each tenon to fit: a perfect job for the shoulder plane. Whenever possible, select a plane that's slightly wider than the area you're intending to trim. Make sure to set the plane for a very fine cut and use a razorsharp blade. As always, take light cuts and make sure to back up the shoulder with a scrap to prevent tear-out.
Smoothing rabbets
shoulder plane, Smoothing rabbets
Smoothing rabbets is another easy task for a shoulder plane. Position the plane so the side of it butts firmly against the shoulder of the rabbet. Use as long a shoulder plane as possible, as this helps flatten out any high spots that a shorter-bodied plane might ride up and over. Just as with a tenon, it's important to back up the trailing edge of the rabbet with a scrap to prevent tear-out.
COMBINATION SHOULDER PLANES
combination shoulder planes
There's a nifty type of shoulder plane available that's commonly called a combination plane. It's basically two planes in one: a shoulder plane and either a bull-nose plane (see Bull-Nose Plane) or a chisel plane (see Chisel Planes). The conversion from one to the other is made possible either by lifting off a top piece (as shown here) or by removing a front section of the plane. Sometimes this type of plane is called a 3-in-1 plane because it can function as a shoulder plane, bull-nose plane, or chisel plane.
Cutting a rabbet
shoulder plane, Cutting a rabbet
You'll occasionally hear a shoulder plane referred to as a rabbet plane. That's because it can be used very effectively for this task. The disadvantage to using a shoulder plane versus a rabbet plane is that the shoulder plane doesn't have a built-in guide fence or depth gauge. But one will work in a pinch as long as you clamp a scrap block to the work-piece to guide the cut, and check the depth often with a rule. Also, since a shoulder plane doesn't have cutting spurs, it's a good idea to scribe a starting line when planing cross grain.
Cleaning out a dado
shoulder plane, Cleaning out a dado
Another job I often assign to a shoulder plane is cleaning out grooves or dadoes. Naturally it's best to use a shoulder plane that matches the width of the groove or dado, but you can usually get along just fine with a narrower one as long as you check the bottom for flatness often. Keep the side of the plane pressed firmly against the shoulders of the groove or dado as you plane.
BULL-NOSE PLANES
A bull nose plane is a special type of shoulder plane that has a very short nose
A bull-nose plane is a special type of shoulder plane that has a very short. Instead of a longer front section, the nose is often only ¼" wide. This makes the plane perfect for delicate work and for reaching in close to corners. The disadvantage to using a bull-nose plane: The short nose allows the plane to travel up and down over undulations instead of flattening them. If you find this happening, it's best to switch to a longer, standard shoulder plane.
Back To Top